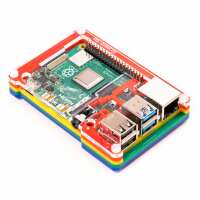
“It looks really good. There were no instructions on how to assemble, but a quick search of YouTube videos shifted that, maybe a link to one would be helpful in future. Also, I think because my pi4 was 2nd hand (from my brother) he had fitted various heat sinks, so the red cutout didn't fit, had to cut a bit out to get it to work. Also I have a pi camera 2 module from a pi 3, I had to remove all the screws and the transparent layer to attach the camera, again some written or web based guidance on such things would help.
Overall, now it's together it looks and functions great.”
Ahoy (and thanks for the review!)
Sounds like you're sorted now, but our installation guide can be found here:
https://learn.pimoroni.com/article/building-your-pibow
It's designed to work with this heatsink: https://shop.pimoroni.com/products/raspberry-pi-4-heatsink - looks like yours is differently shaped which might explain why you needed to modify the red layer.
“Good quality and easy to put together, with all the tools you need. It doesn't protect against dust, which I'm slightly concerned about, but a good basic case.”
“Well made from what I assume is laser cut plastic sheets. Fun to assemble but it only takes a few minutes. Only improvement I can think of would be to supply some soft feet (rubber?) rather than the plastic bolts that act as feet currently. Might protect the surface the Pi is sat on a little better.”
“Very delightful case, plenty of space to add a fan. And it looks like I will need one!
Went together easily. Because it's only 4 colours, it made me think of Microsoft more than rainbows, but still looks good”